Carbon Fiber Console

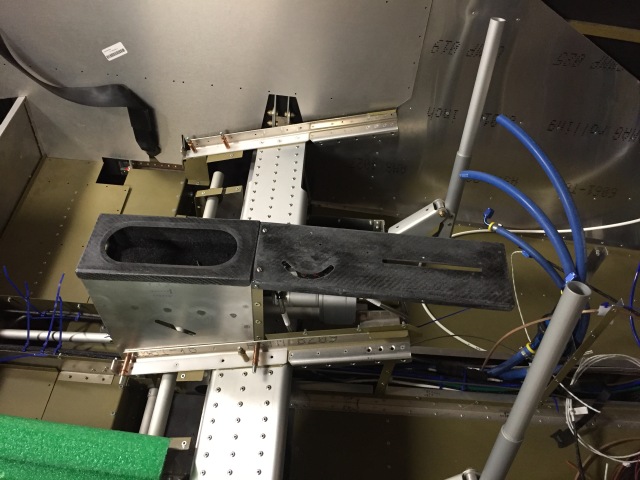
I picked up my carbon fiber parts from the paint place today. After I cut and cleaned up the pieces I had tested some clear coats on the scrap carbon fiber pieces. I got close to what I wanted but not exactly. Since I had to bring the canopy in to get painted I asked them if they could spray the parts with some left over clear they might have from another project. Well today I got to pick them up and they are exactly what I was hoping for. Carols at McCluskey’s Ltd. did such an awesome job on both the console parts and the canopy and was extremely reasonable on the price. I’ll definitely be taking the plane to them to get painted. Also Hernan at Montenegro Manufacturing was very easy to work with on getting the carbon fiber parts made up. I think I surprised him when I told him I was going to make the molds for the two parts… I don’t think he likes to make the molds 🙂

This was a great project because I got to learn a few things I probably wouldn’t have had a chance to learn. I think that’s what experimental aircraft building is all about. I mean after all you’re building an airplane and who gets to do that all the time? So why not take those opportunities to push yourself and learn new things. Of course you need to know your limits and you don’t want to do something unsafe, but use the time to do things you probably won’t have a chance later to do.

The final finished parts. I know there are some flaws in them but they came out exactly how I was hoping. I’m sorry happy with how they turned out.

Just a reminder that this is what they looked like after they were cut out and cleaned up.

And how they came from the manufacturing place.


Carbon Fiber… Yeah Baby!

I picked up the parts I had done up in carbon fiber. I’m a bit disappointed that they don’t look more finished. I was kind of expecting nice and shinny, free from blemishes parts. I think that after some clean up and a little filling then a good couple of coats of a clear gloss finish they will look good. Right now it’s hard to see that they will be what I wanted.

Here’s a photo of the raw parts. They need to be cut and sanded. I used the Dremel with the bendable cord extension to cut them down to about the right size then used a sanding wheel and the electric sander with 240 grit paper to finish them to the correct size. You can see the outline of the original holes and cut outs, but I’m using the original parts as a guide to make sure I don’t cut too much. This stuff is super strong, but it cuts very easy and it’s easy to sand too much off.

The parts all cut out and sanded. I think the cubby hole cover came out the best. I was thinking that it wasn’t going to because the mold wasn’t so good.

Everything fits great. I’m going to wait to drill the mounting holes in the cubby hole cover for now. The brake lever and throttle also fit fine. The throttle coveris a tad bit “flexy” especially around the brake lever area. I’m going to add a bit of epoxy resin to the back to stiffen it up a bit. I think it will be fine once it’s mounted to the other console skins though.

I can’t wait to get a few coats of clear coat on these. I ordered some very good UV stable clear coat that I should have in a few days. I’ll do some experiments when I get it and hopefully it will work as advertised.

BTW I have one extra of each one of the covers so if anyone wants one or both just let me know. I want to make sure I don’t mess this up first before I give them away, but if you’re willing to do a little extra work and want to take on the challenge I’m more then happy to share.

Mold for Throttle Console

Started on the making of the mold for the throttle console. I’ll do the gel coat and fiber glass backing tomorrow. Hopefully all goes well and I can get the mold down to the carbon fiber guy next week and have the parts by the end of the year.

Plug ready to go, just need some waxing and mold release.

Carbon Fiber Parts

It’s been bugging me that some of the parts in the Sling interior are a sticker that looks like Carbon Fiber. The sticker eventually rubs off, especially on the throttle console. I believe 3M also makes a better Carbon Fiber covering, but still it’s a covering. I’ve been doing some research and am going to attempt to first make a mold of the throttle and glove box covers. From these moulds I should be able to either make a carbon fiber replica or have someone do it for me. The instrument panel is somewhat straight forward since it’s just a flat piece and then needs to be CNC’d

From what I’ve found about making the mould is that you use a release agent (PVA and Parting Wax) on the part (called the plug) and coat it with a gel coat resin (and MKEP hardener) that you brush (or spray) onto the part. This forms a negative or positive mould depending on how you mould the part. You then cover the gel coat with layers of chopped strand mat to build up some rigidity of the mould. Fiber Glast has a good tutorial of the process and there are a few videos on YouTube. You can also use an epoxy putty or Bondo to form the rigid part of the mould if you like. It really depends on how big the part is, the shape and how durable a mould you need. It’s got me intrigued enough to want to see if I can at least make a mould of the two parts.

I ordered the following from Amazon

  • Creativity Street Modeling Dough, Blue, 3.3-lb. Tub (AC4070)
  • Fibre Glast FibRelease
  • Fibre Glast Orange Tooling Gel Coat – Quart w/ hardener

The creative dough is a filler so that the gel coat doesn’t seep through holes and cracks in the plug. I’ve seen people using the Pelikan Nakiplast modeling clay, but it’s around $30, so I figured I’d give this other one a try. The FibRelease is a new way of coating the plug instead of using both the PVA and parting wax.

On another note I found this cool 3D CNC machine for around $1600 called XCarve from Inventables. Theres a 500, 750, and 1000mm wide version and also more parts where you can expand it even larger. It uses free software called Easel to create and sending it to the CNC machine. I suppose if I were going to make more parts for the plane then this might come in handy but right now the only thing I’d use for is cutting the panel which I can probably do cheaper then $1600, but still very cool and Christmas isn’t too far away so maybe, just maybe I might get one.

I should be the materials in a week so I’ll post my success or failure on the blog. If the moulds come out good and I can find someone to do the Carbon Fiber then I’d be happy to offer the use to the builders who might want to do the same. I can’t say it’s going to b really cheap, but probably fairly reasonable.